
It’s time for a year-long review! This year Phenomena saw a bit of a resurrection. Though it was originally a retired machine due to focus on newer and bigger machines, it found new purpose. The driving factor was its inspiration and predecessor Phenomenon; with the high cost and complexity of running a 30lb robot at multiple events, I wanted a way to test out the geometry of the machine without the risk of losing up to thousands of dollars on a hard match. Even beyond that, I wanted something that worked well for travel outside of driving range and far less expensive. As a result, it was time to work on a new beetleweight!
August
The core of Phenomena’s shape is a direct response to an obvious weakpoint on the top of the machine: self-righting. While the hoops do good to resist flipping when tipped over backwards and maintain blade speed, they run the inherent risk of falling on its face. In Vorion this is handled by adding a self-righting arm that definitely helps the bot self-right but also runs the risk of getting struck while self-righting against a very mobile opponent.
In contrast to this, Blue Marlin, a cousin of the Phenomenoids, foregoes any separation between blade and ground and instead uses a rounder, more spiral-shape disc that violently throws the robot around. This method is certainly effective as Marlin has rarely ever been stuck whether the blade is or isn’t working but the violence this imparts to Marlin is one I want to avoid. Everytime the machine is bouncing off of the ground, it is imparting more strain on the blade and its system which can prematurely damage a robot in a particularly violent self-right. Even further, the blade’s energy has now been spent throwing the bot around which means it won’t be ready for an enemy attack and you lose precious seconds of attack potential. The primary design philosophy of the Phenomenoids is the control and adaptability with damage coming as a result of proper application of control. Therefore, no moment of the machine’s activity is to be uncontrolled or unexpected so all interactions should be within expectations especially the self-righting process which is arguably among the most critical acts this bot has to perform.
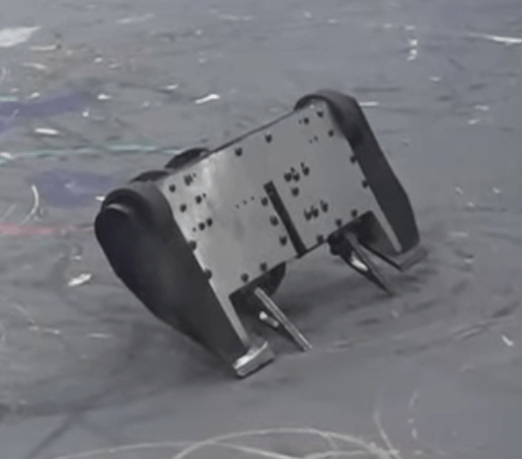
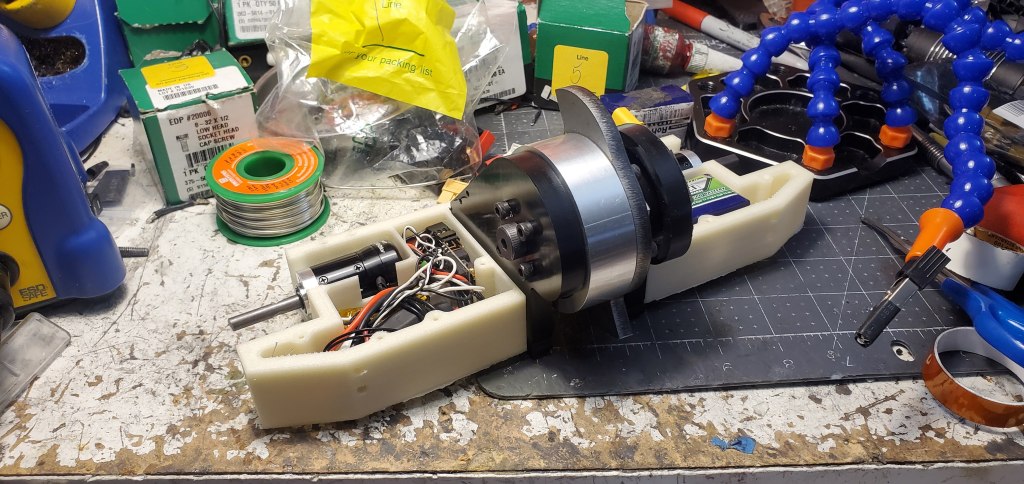
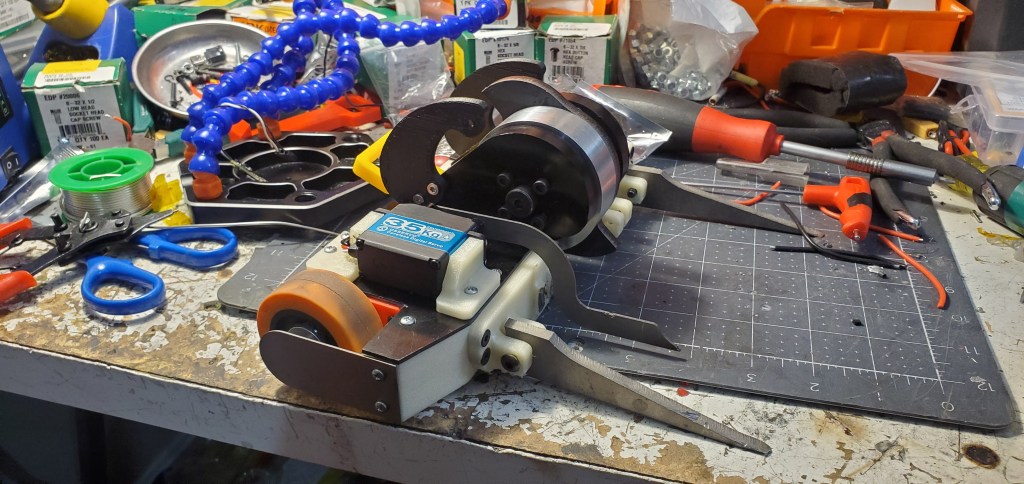
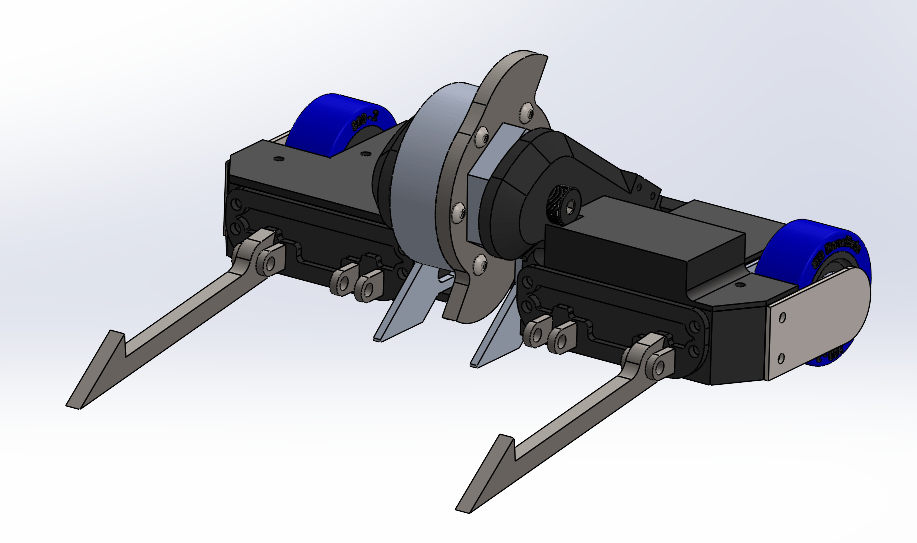
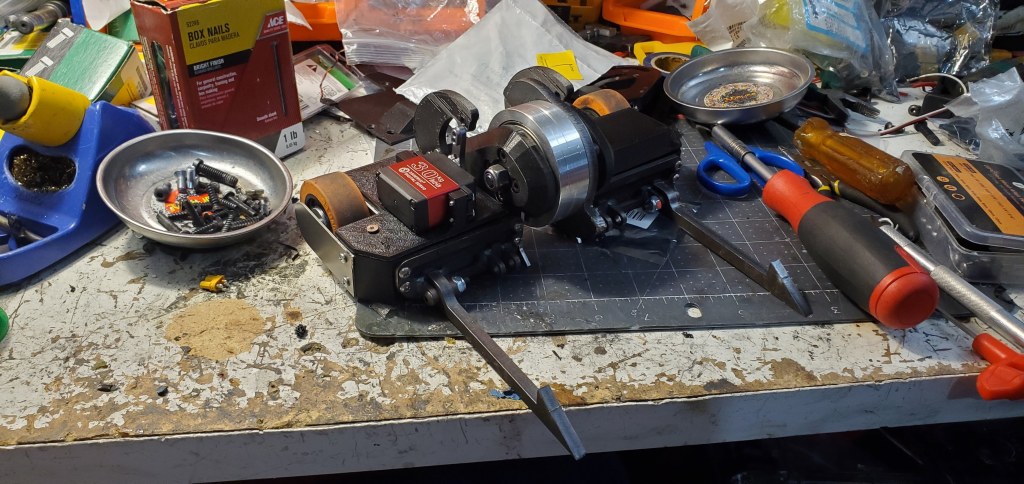
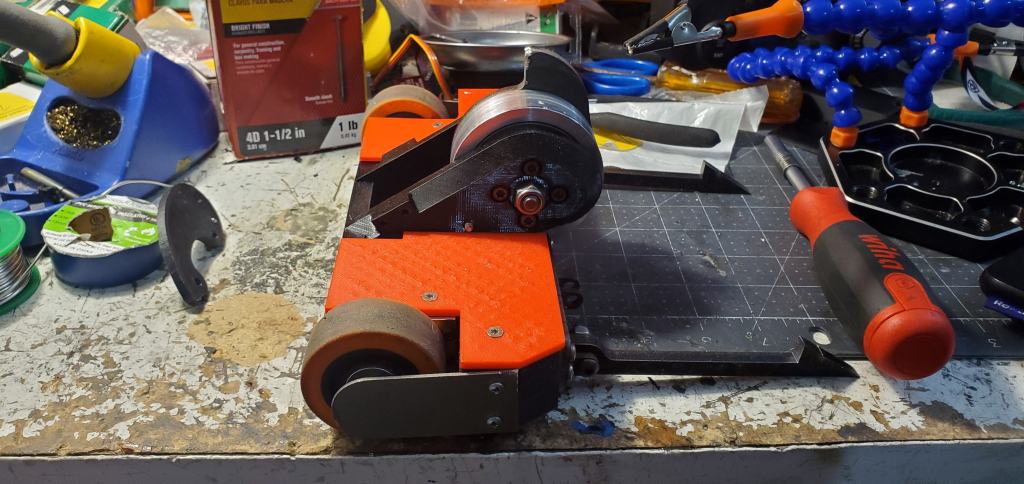
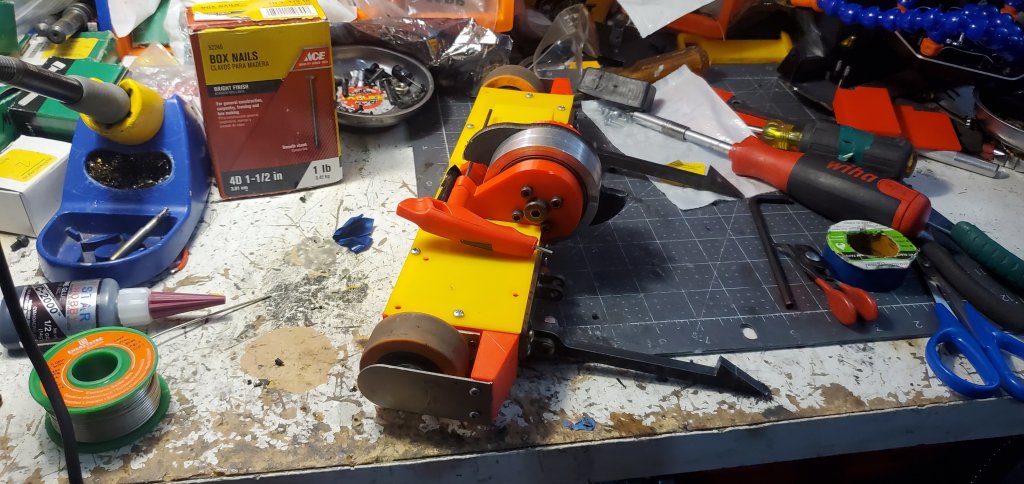
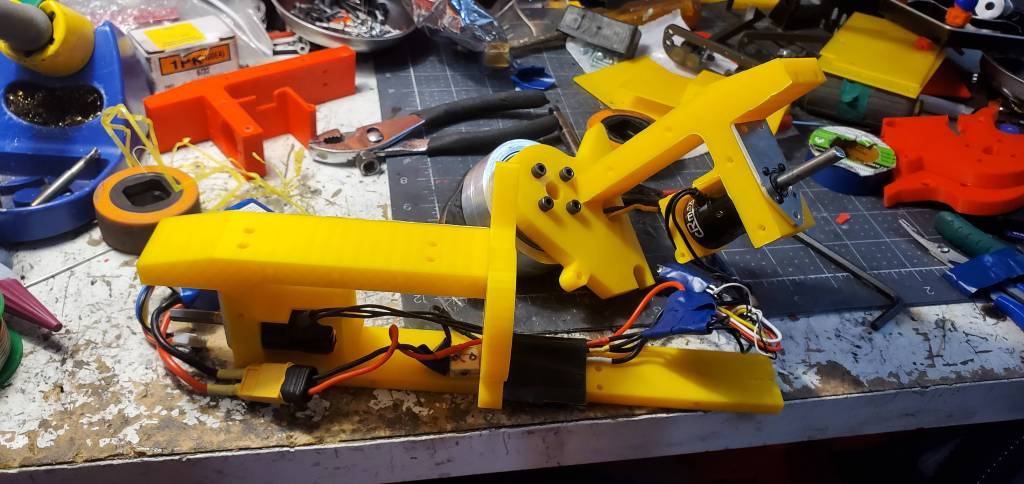
The result of my attempt to shrink Phenomenon lead to the Phenomena design you see before you. By making use of a hubmotor, it mirrored the design of Phenomenon and allowed the other components around the robot to get as close as possible, especially the lifting arm. Though the Just’ Cuz hubmotor would be an easy drop-in solution, I wanted to repurpose older parts I had that I wanted to use first.
Phenomena also has a few other changes of its own the keep it from a pure Phenomenon shrunken clone. One big factor is the lacking of the side bracers on the robot. These have been good defensive attributes on Phenomenon and provide some uniqueness to its styling, this has also been a catchpoint that in theory vertical spinners have caught before and likely a good horizontal could do as well. While this shift would also cut weight and make the chassis easier to print, it created a physics problem as there was no longer a support point forward of the weapon (this will come back later in the write-up) which makes the robot want to nose-dive.
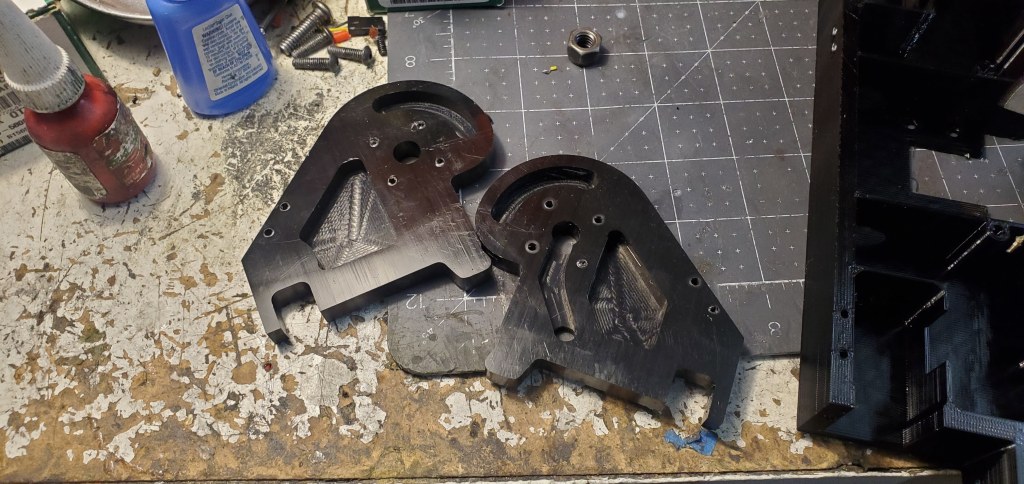
The third major design decision was to try 3mm AR500 steel fork mounts. In the 3lb division AR500 is rarely used beyond weapons but from experience in the 30lb division where 1/4″ AR500 does an excellent job serving as fork mounts I figured that 3mm would be plenty strong for a machine 1/10th the mass. Due to the high strength, weldability, and stiffness of this material I wanted to use it as the principle armor and chassis stiffener. Because of this material’s higher stiffness, the rest of the chassis and frame rails shouldn’t worry about bending until the steel bends which is huge in a material as brittle as glass-filled Nylon. There were still deep concerns about having the weight to try these out, but that wouldn’t be known until we begin building. With these concerns at the back of my mind, the design was ultimately pushed forward with the desire to test the theory out first.
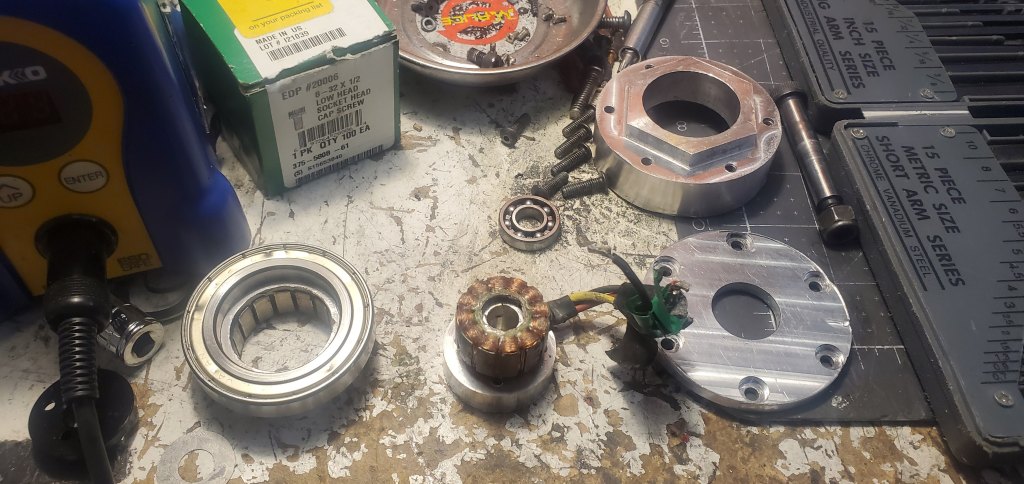
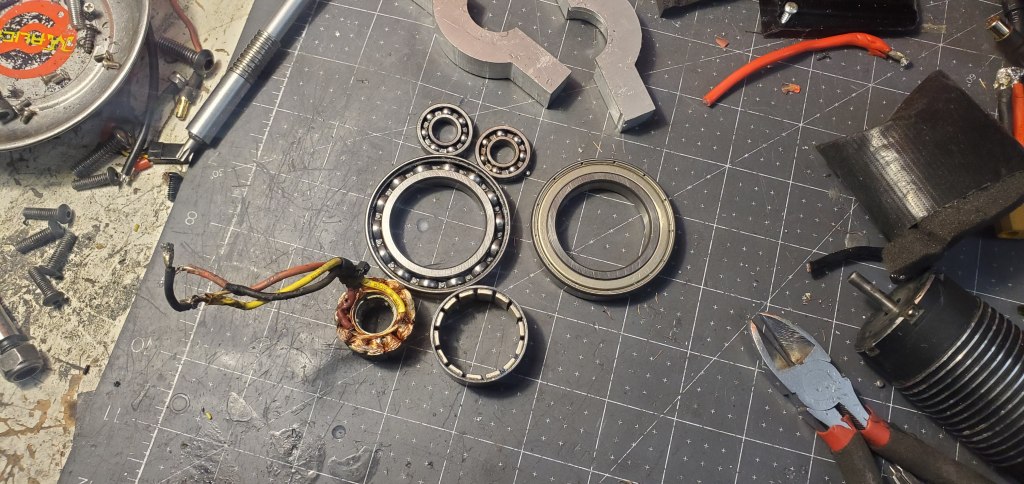
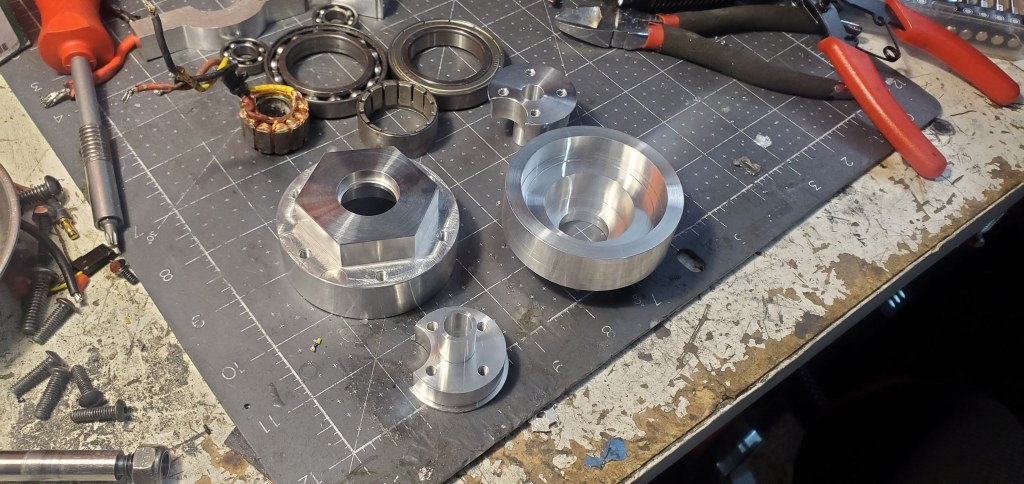
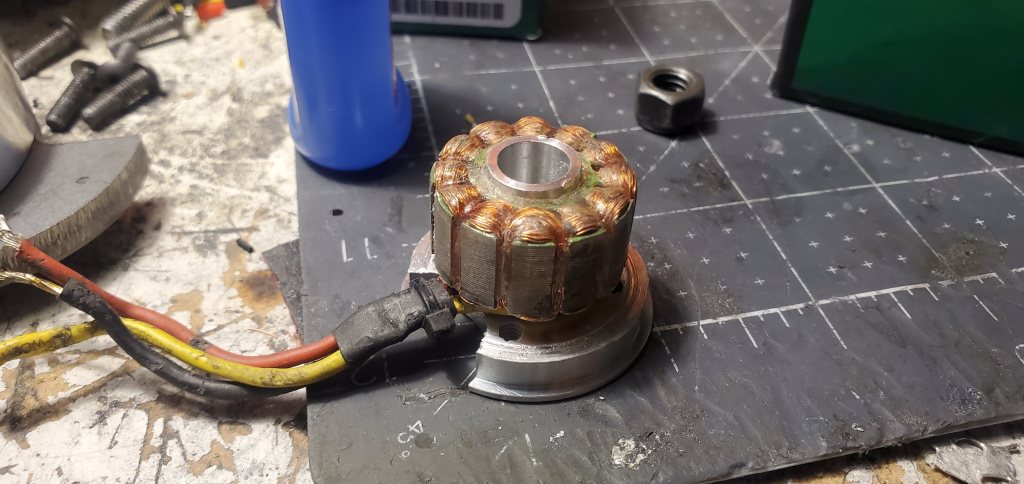
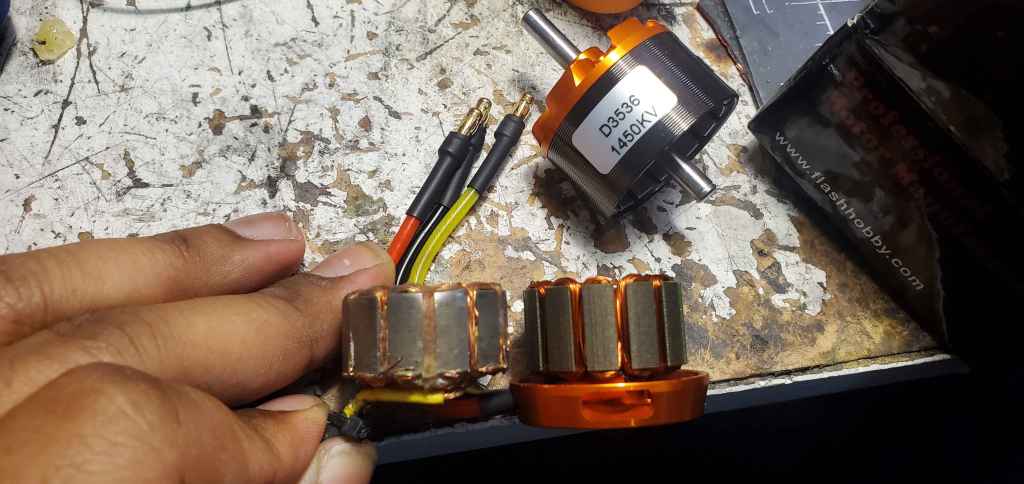
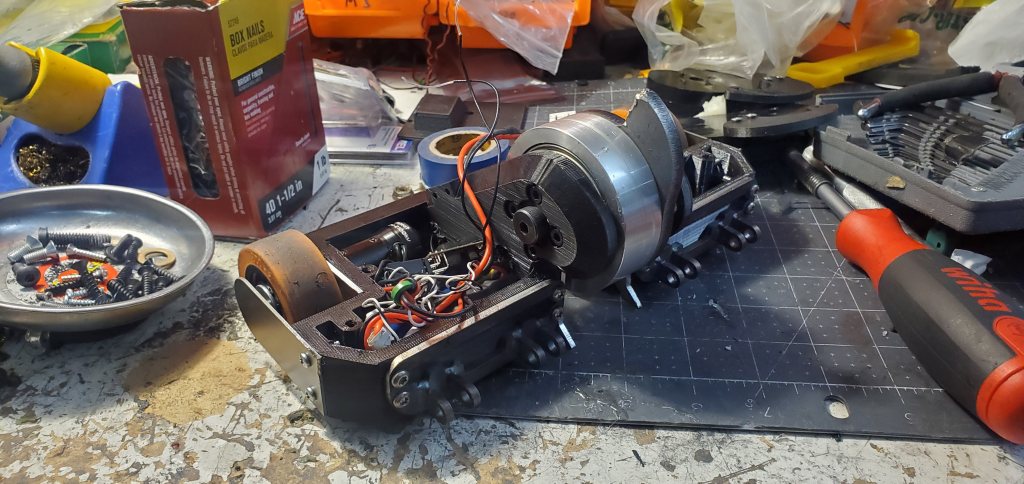
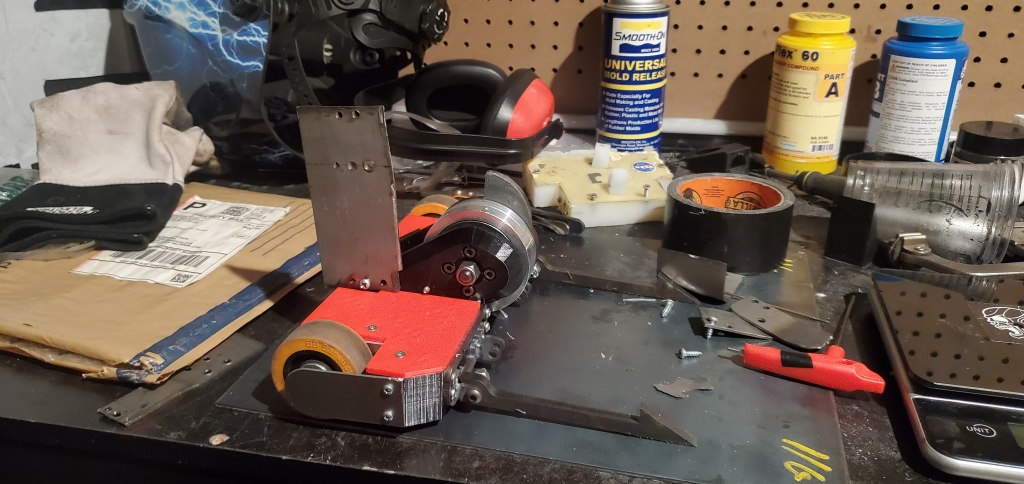
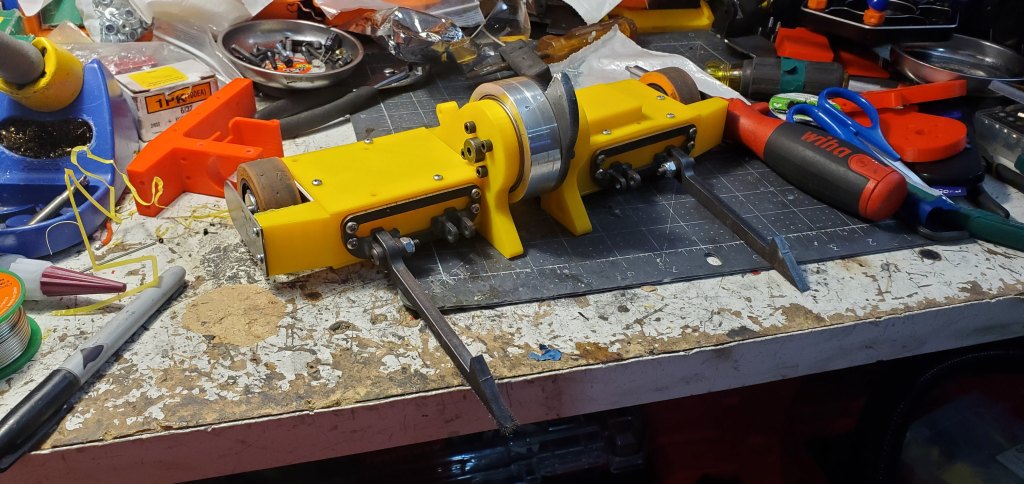
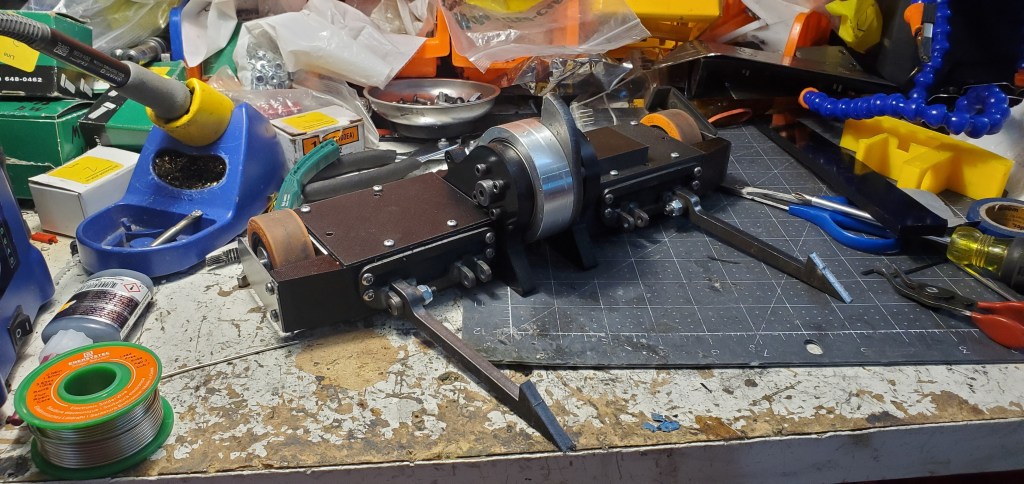
The first act was taking apart the old hubmotor from the previous version of Phenomena from way back in 2021. This was my first attempt at building and designing a hubmotor from scratch using my college’s machine shop. While some critical retainment features were off when I first designed it, it had not fought often enough to really gain much wear so I wanted to remove any transferrable components such as the stator, rotor, and bearings. After a bit of heat and some hammering I was able to save all the components except for the main body that I no longer needed.

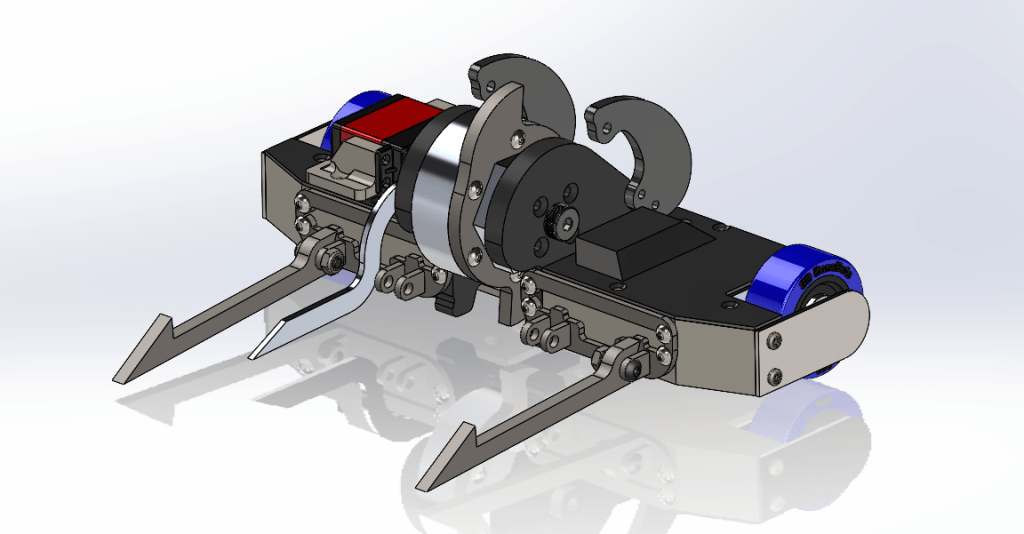
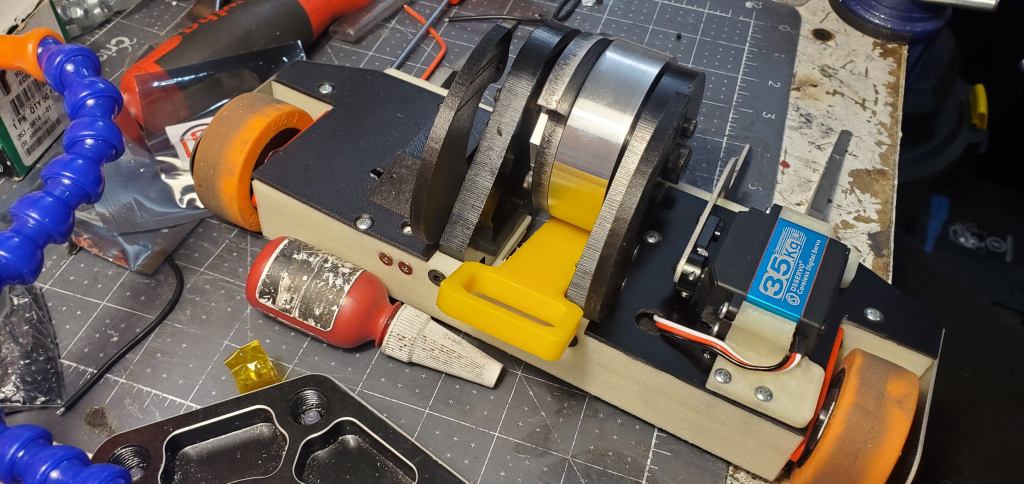
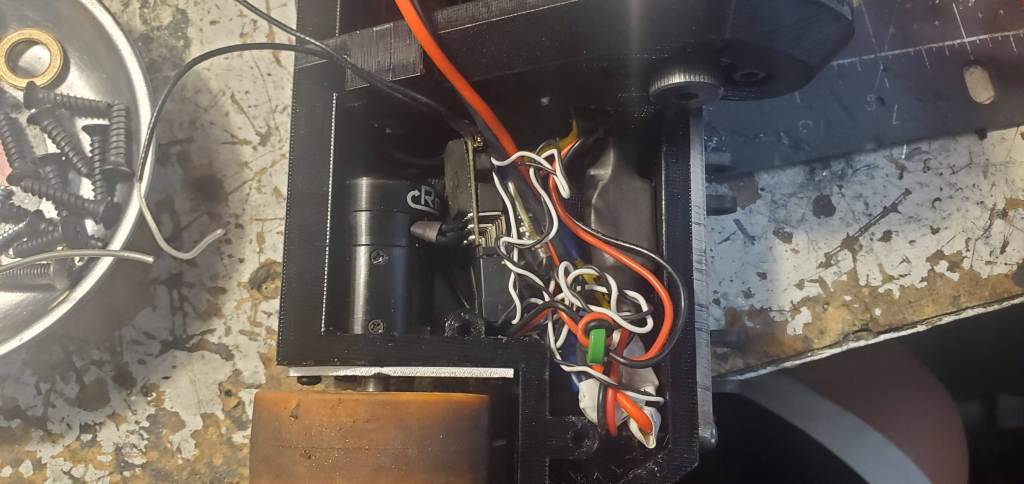
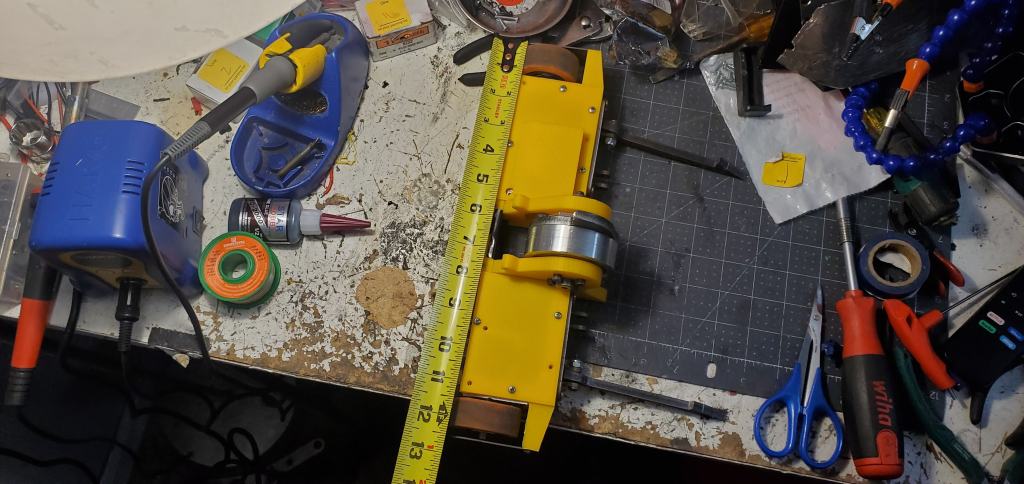
The hubmotor itself is one commonly seen around other building circles. The motor itself sits on a stator mount that transfer all of its force into the large bearing on the far left. The outer body is a single piece which holds the outer race of the large bearing and constrains the smaller bearing that sits slightly offset from the blade itself. The single body ensures bearings maintain alignment with another and ensures smooth travel. The blade itself slides over a hex shaped bore to transfer energy then bolts to the body of the hub via 8-32 screws. The entire assembly rests on a 3/8″ shoulder bolt which constrains the stator mount on the far left and helps retain the smaller bearing on the far right. A small bronze washer spaces the bearing off of the frame rail to ensure no collisions with the frame rail of the robot.
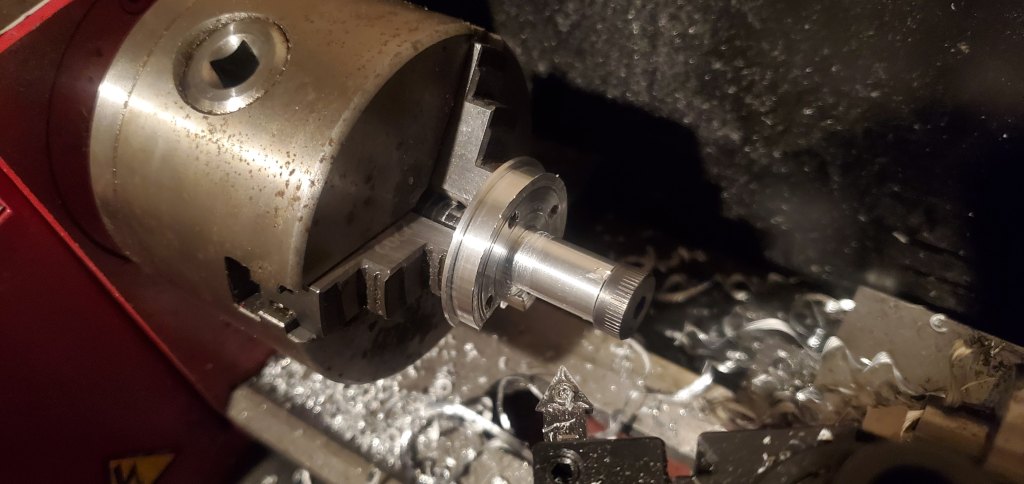
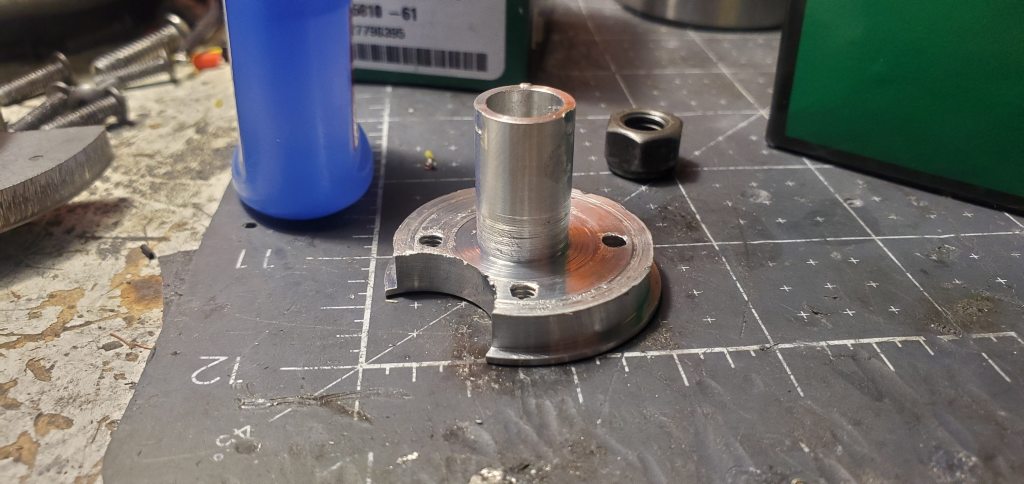
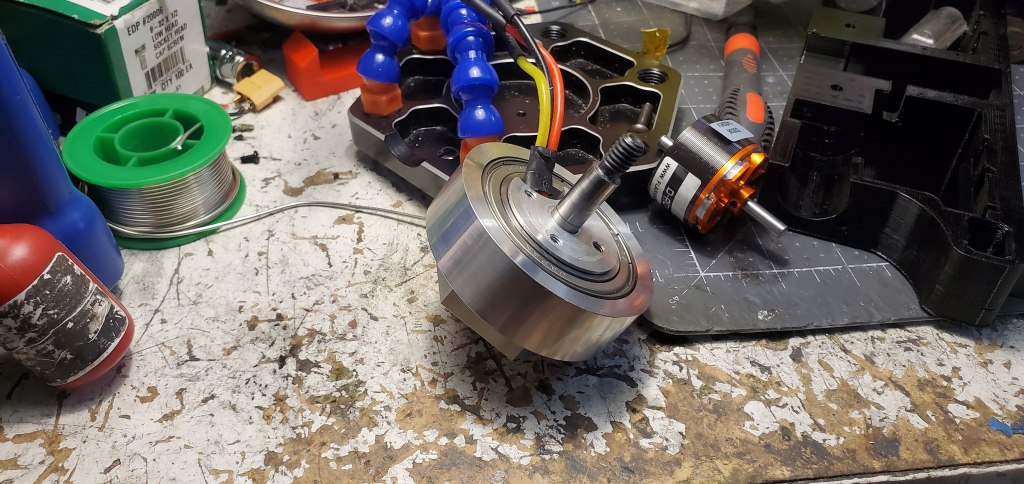
I ordered the stator mount and main body from overseas then received them in ~2 weeks total. Unfortunately I didn’t account for space for the wires (wires do take up space!) so I had to lathe down the stator mounts some, but ultimately it wasn’t too much trouble. Using a 3/8″ shoulder bolt and some super glue, I was able to make a janky arbor to turn the component without marring the aluminum. It did eventually break loose after the heat gained during machining weakened the super glue which resulted in a rough surface finish. Even so, it was still very functional and a light application of Loctite 680 retaining compound onto the aluminum circle before pressing on the motor stator assured that it would be in good shape.
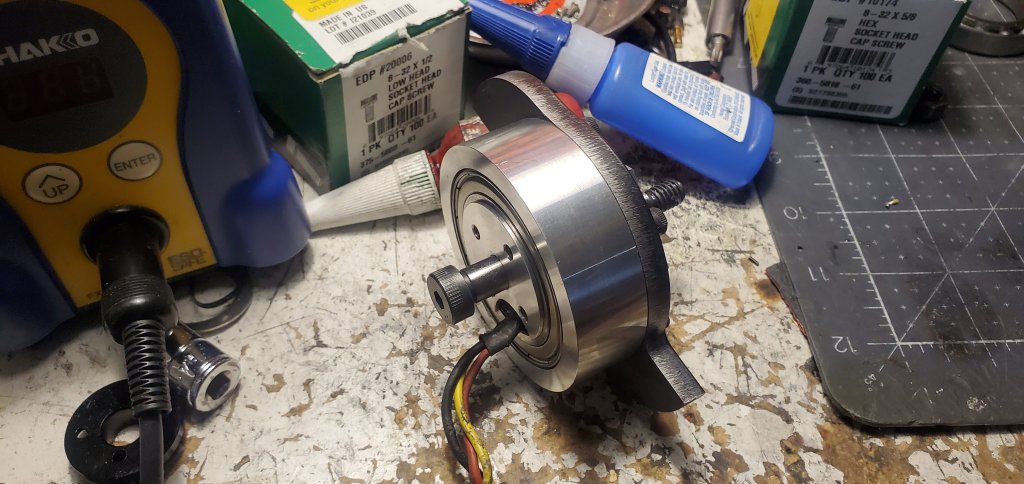
Once the stator was assembled, the everything else slid together fairly easily. The pocket for the big bearing was a little looser than hoped for so I added more 680 compound to the surface then let it sit with the shoulder bolt keeping all components concentric while it cured.
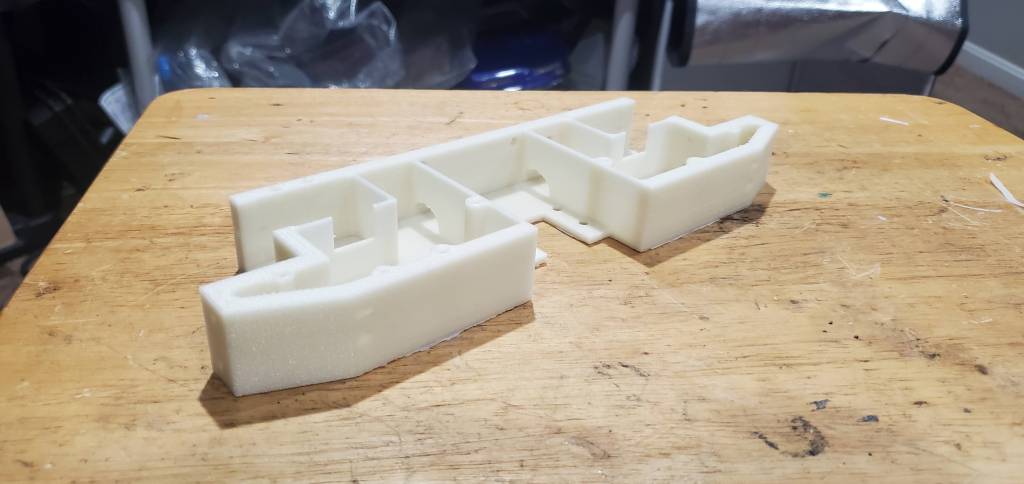
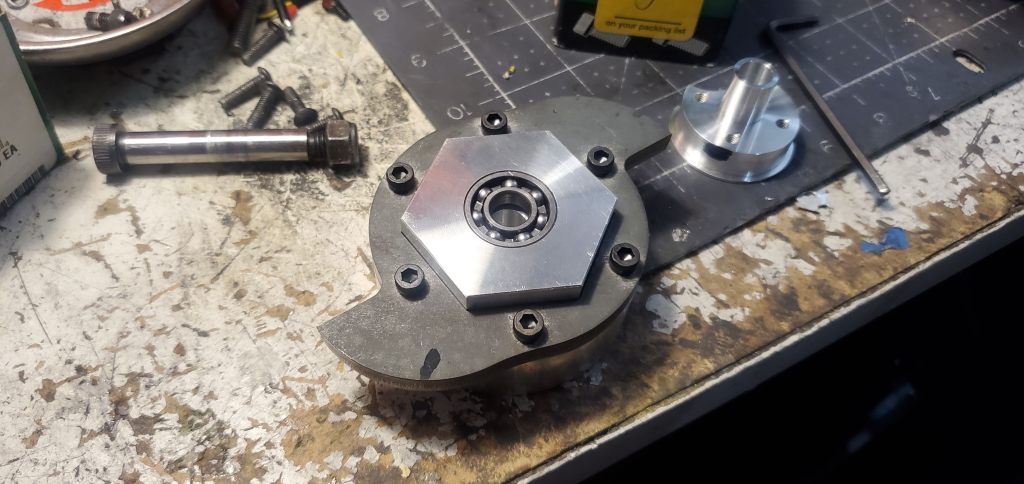
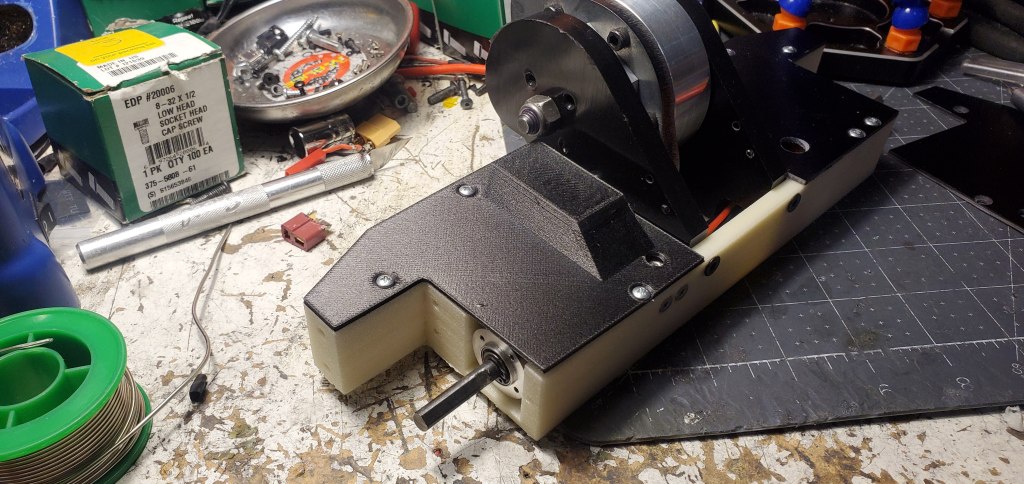
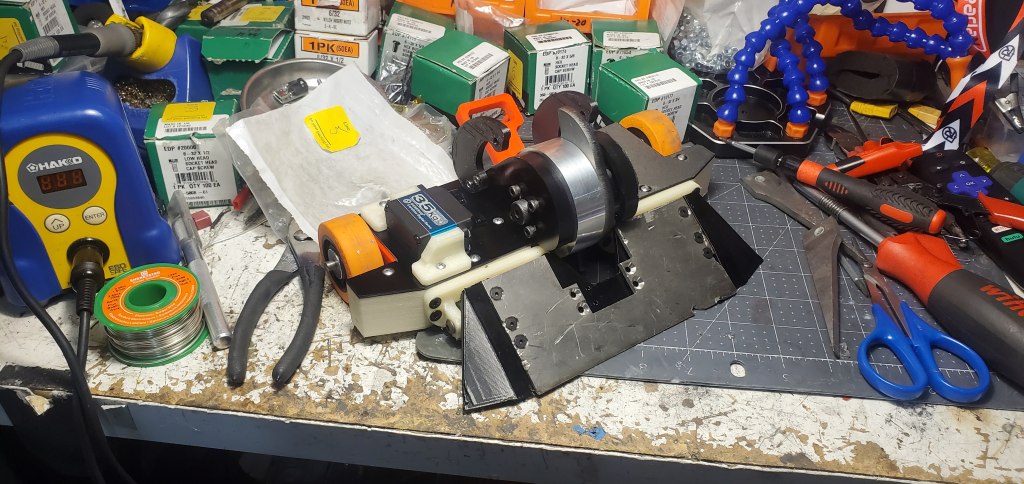
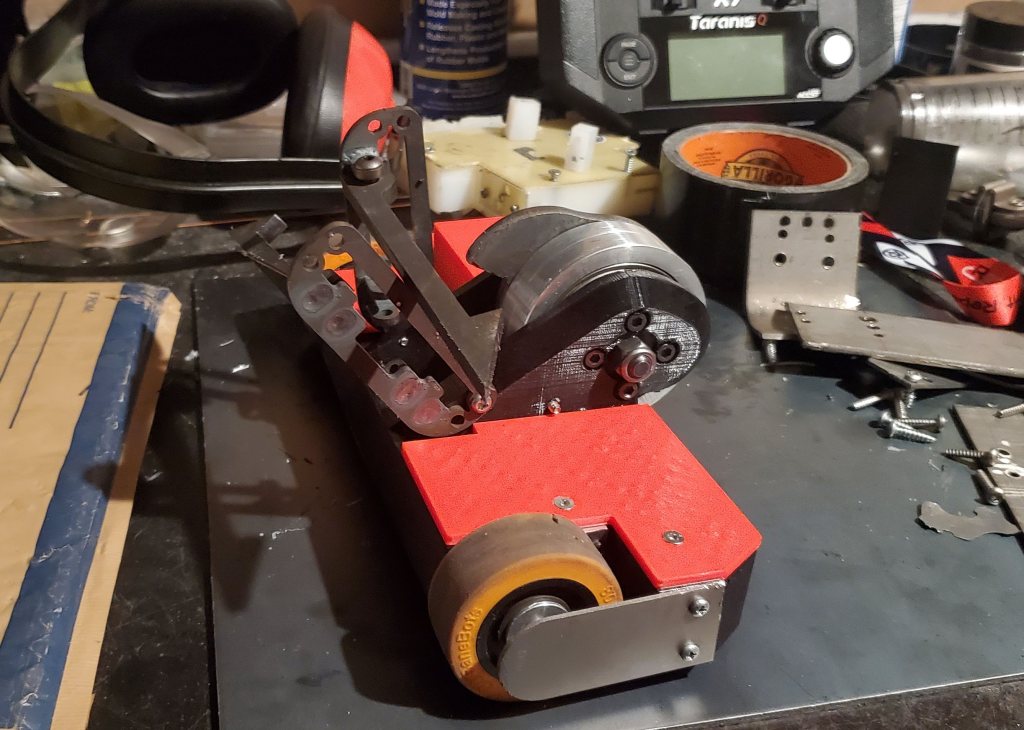
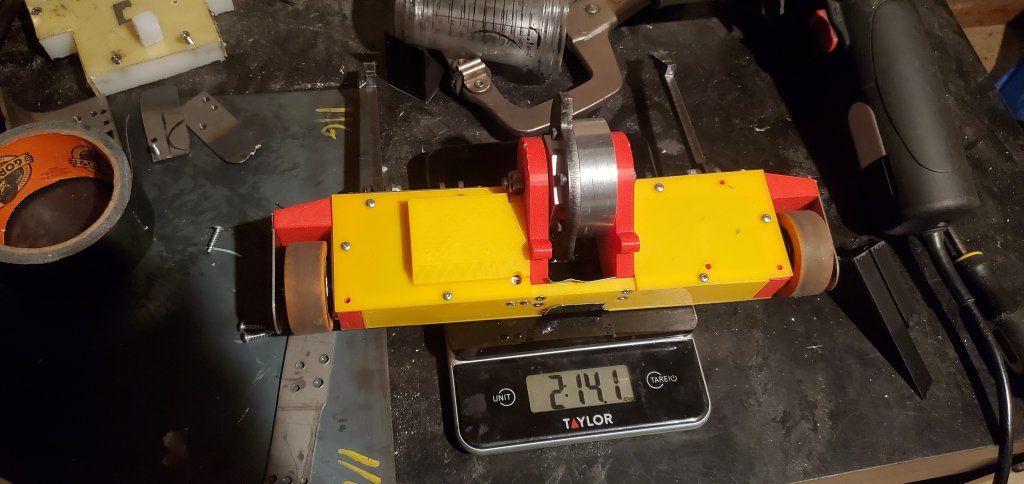
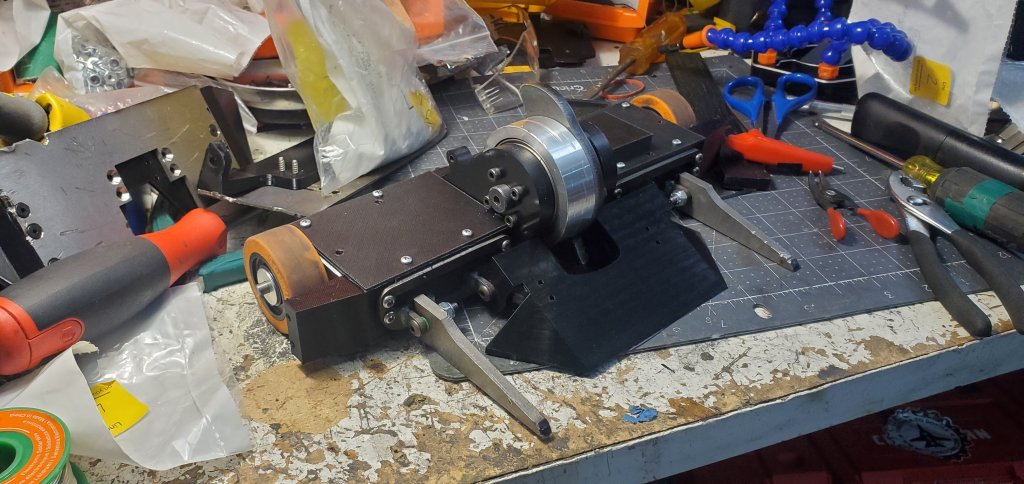
The next step was the chassis. Since 3lbers are so lightweight, they do not have to worry about the same physics as a 30lber. In practice, this means it won’t bend or break first but rather its inertia is so low that it is easier instead for the entire machine to be thrown which is why many of them get launched to the ceiling in fights yet continue to function. However, you still need internal stiffness to the system to ensure critical features like drive and weapon don’t flex too much and interfere or even collide with other important items. In order to balance these features, I chose UHMW for the central frame rails and Glass-filled Nylon for the main chassis. Though the Nylon isn’t as flexible as another 3D-printed material like TPU and risk shattering, its stiffness was critical for function.
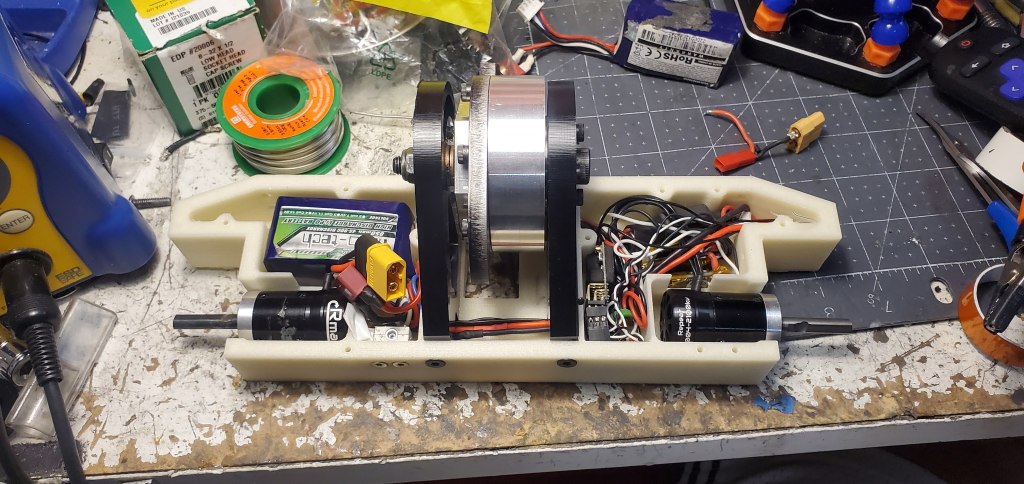
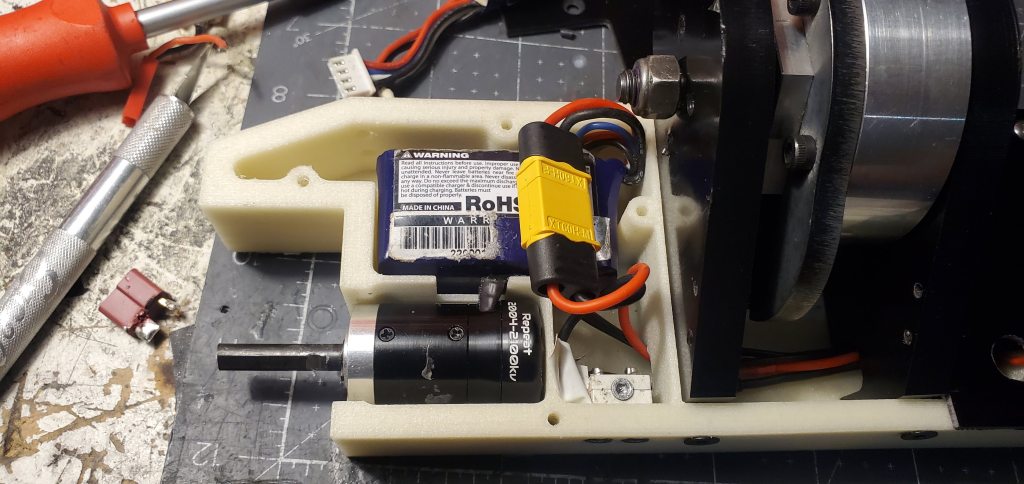
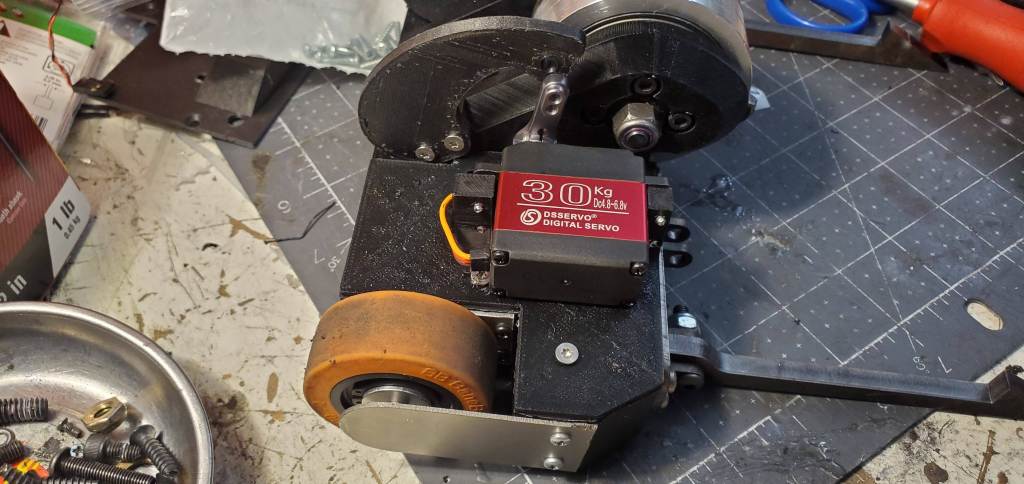
The electronics for this machine were fairly straightforward as they were pulled from the electronics of older beetleweights from the past that I had not used in awhile. These were primarily BLHeli32 flashed ESCs purchased from Amazon and an iFlight 80A Blitz for weapon with a Fingertech switch. The main factor for internal sizing was the Repeat Max and the Turnigy 850mah 3s Lipo battery. While the Max was definitely overkill for drive (its plenty even for control-type machines) this was used in order to share spares with its teammate Cattywampus. The one feature of this machine that posed a particular problem was the XT60 connector. Other 3lb machines have been able to get away with a smaller XT30 connector, but I had two reasons for wanting to stick with the larger connector:
- It ensures no melting. The ’60’ in the name refers to the highest number of amps it could run continuously. This also means that its peak or ‘burst’ current is very high, well beyond the bounds a 3lb robot’s ability. For a hubmotor system where there is no additional reduction on the motor (i.e. no pulley or belting system separating the motor from the blade) the motor will draw very high current as it comes to a stop (either from a very powerful impact or self-righting) which means it will be drawing lots of current from the battery. Since we also know the high current (which means a lot of electrons) want to all cram through a small area (i.e. the gold connectors) it creates a lot of resistance as they all push and shove. The bigger the connector, the more area, the lower the heat which prevents failures or premature wear.
- This allows batteries to be testable on the larger ESC systems in the 30lbers. In order to standardize the systems across the team, all machines were organized around a few common connectors. For the individual ESCs in the 30lbers, they were standardized around XT60s. This means that if the need arises the batteries in the 3lbers could be used to test for these controllers to program/verify function on these controllers. It can create some inconvenience in situations, but when you remember what everything is built on it begins to make sense.
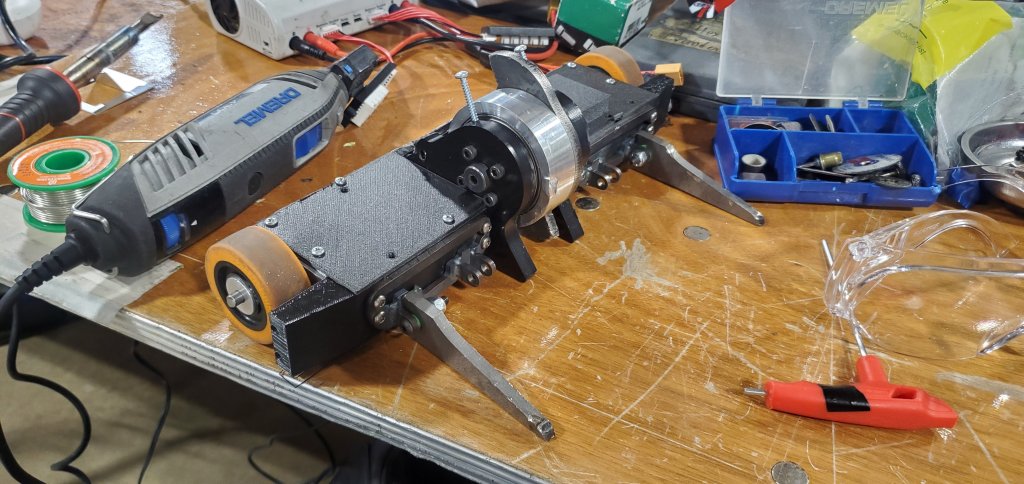
In order to adjust around the big plugs, a simple solution was designed: design in a bubble! With the use of carbon fiber Nylon prints, it was pretty easy to add some room for the plugs. It does a pose a risk for a future fight against sawbots, bot for its first event of the year at Battle in the Burg this was sufficient.


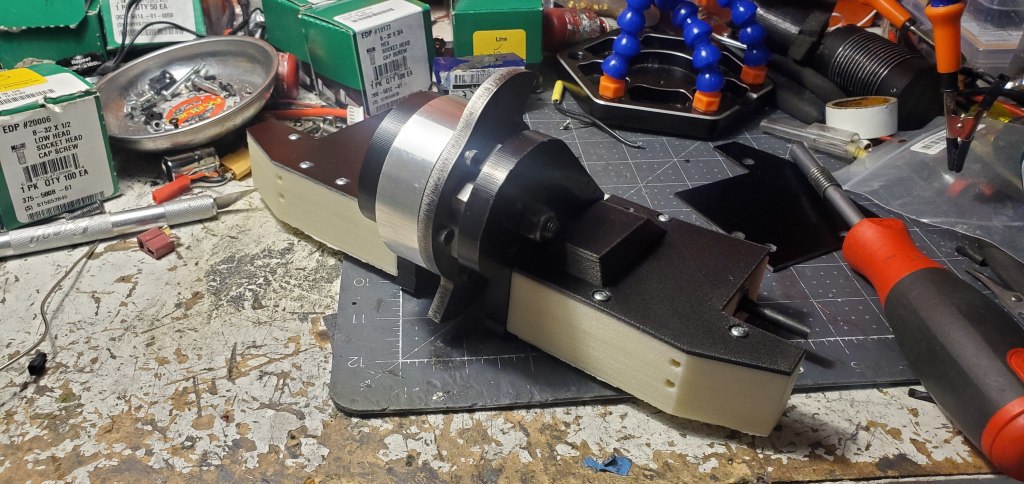
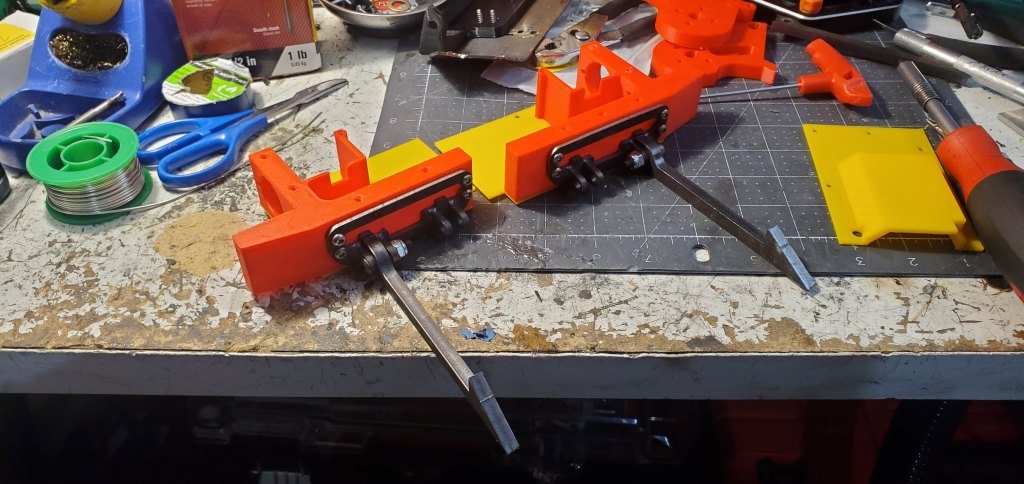
After that change the chassis flew together pretty quickly. At this point some of the final components had not been swapped in from the 3D printed prototype parts but the steel fork mounts were welded up. Unfortunately the small details about weight slowly added up and wound up already behind on weight. In an effort to bring the weight back down Nylon fork mounts were printed and the fork material switched from AR500 to Grade 5 Titanium. The Titanium will wear down a bit faster than the AR500 but it should still be plenty strong at this weight class.
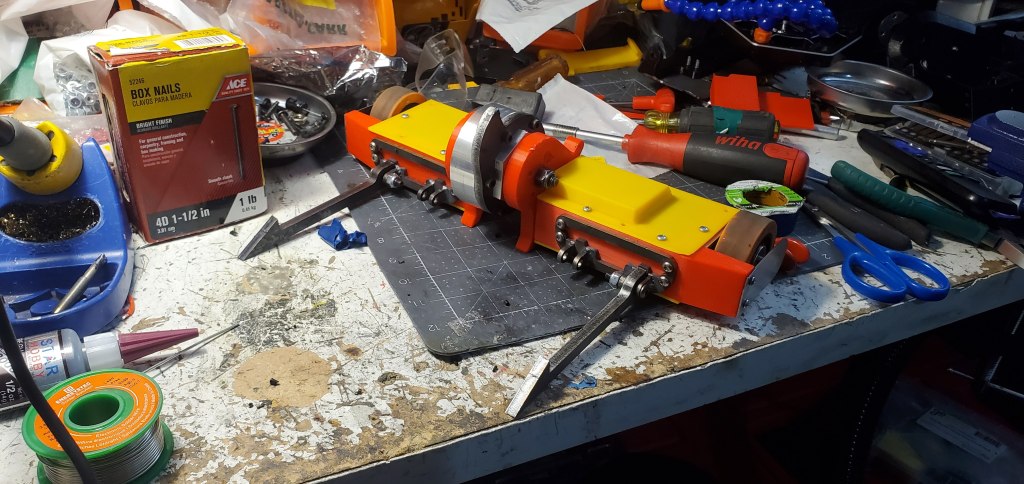
With the fork mounts handled (for now) it was time to try out the configurations. Through a bit of internal streamlining and trimming one of the mounts enough weight was freed to add the wheelguards. In another effort to reuse old parts, the 3mm Titanium wedge from the previous version of Phenomena was reused as best possible by bolting it to a TPU base. It was definitely sub-optimal but given that the event was very soon and the bot was close on weight it was an acceptable oversight for the moment. While this was designed to use the same spacing as Cattywampus and therefore use Catty’s wedge, the cutout required for the blade to pass through would require further modifying the wedge and potentially weaken it.
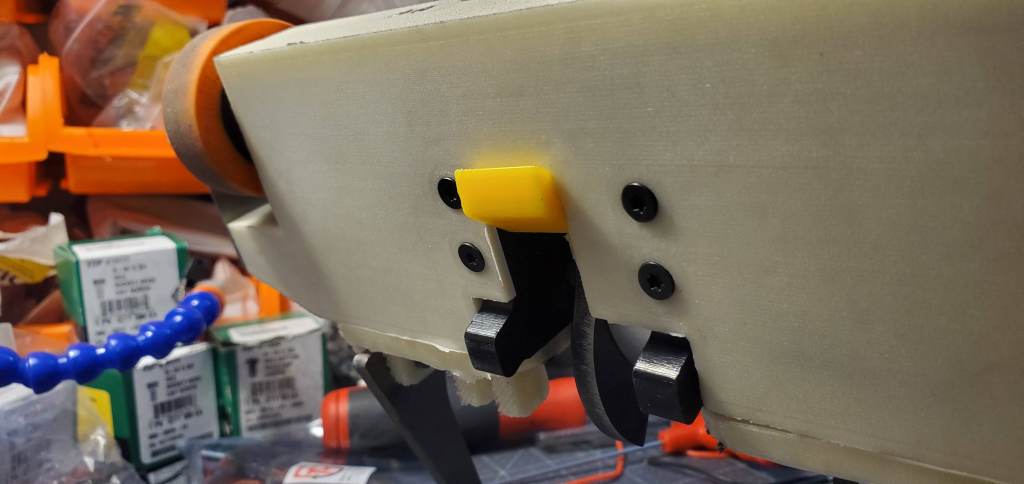
The very last touch on the machine was creating a safety lock. The geometry didn’t allow the holes in the hoops to constrain the weapon quite as well as hoped so this new lock was designed. For ease of travel it doubled as a hook so I could more easily hold it while waiting in line. It wasn’t perfect, but it did prove to be very convenient at moments and was a fun exercise in product design.
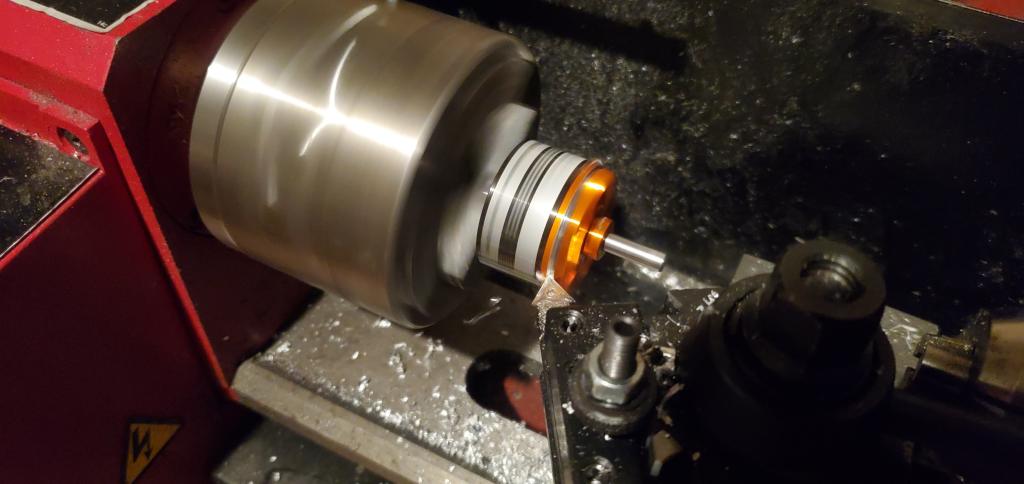

It was also about this time that I realized I did not have a second Propdrive 3536 around to build the backup hubmotor. Through panicked searching on Amazon, I was able to roughly determine that a Flashhobby D3536 was roughly similar in its outer diameter and length so I sent in the order and it arrived the night before the competition. Fortunately my guess was fairly accurate with the stator being almost the same size with fairly similar kv ratings! After verifying that the stator fit on the mount fairly easily, the router was turned down on the mini lathe to the right diameter to fit in. Both components were covered in more retaining compound and and left to sit overnight. Now on to the competition!
Battle in the Burg
Most of the event itself was described in the event post here so I won’t go over it again but I will highlight the key takeaways that affect the next machine.
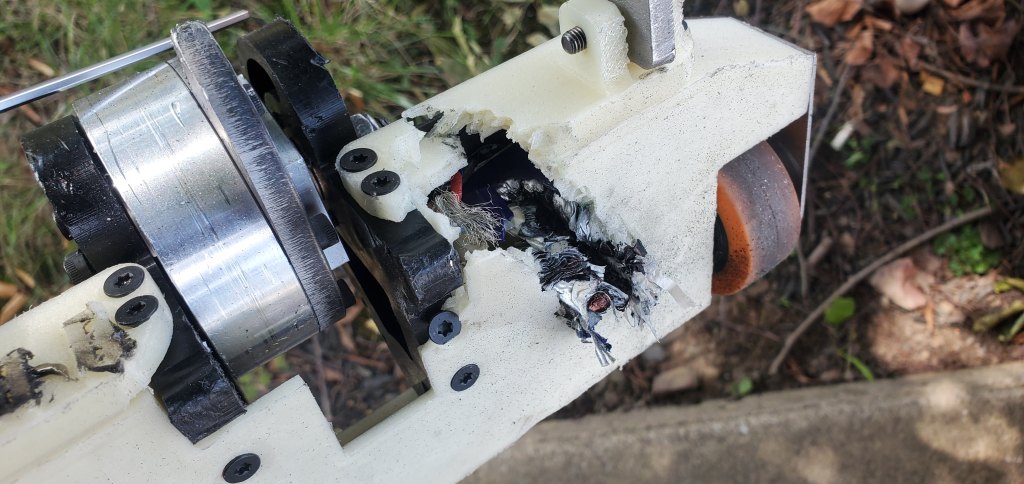
- The Nylon chassis was too brittle. While it never had to fight a big horizontal, the fork mounts did shatter after someone was able to hit the outside of the fork. Even though the chassis was stiff enough most of the time to deliver good hits to the opponent, if it was directly struck it was more likely to crack or shatter. Getting the steel fork mounts into the next version would be critical for strength.
- The UHMW center rails were great for transferring force but they need a more forward support point. As expected, the machine drove poorly due to it leaning so far forward that the weapon would dig into the ground. The lifting arm was able to offset this somewhat by pushing the nose of the robot upward but it also put the lifting arm into harm’s way far more than intended. The lifter was still marginally effective so there’s still a desire to carry it forward but it wasn’t a guarantee due to weight constraints.
- The hoops did work fairly well for self-righting. Though it wasn’t instantaneous, the robot did get back to its wheels faster as a result of the blade giving up some energy to pop it back onto its feet. It was very helpful in this case due to the servo being more limited than the gearmotors on the 30lbers. If possible, it would be nice to keep these going forward.
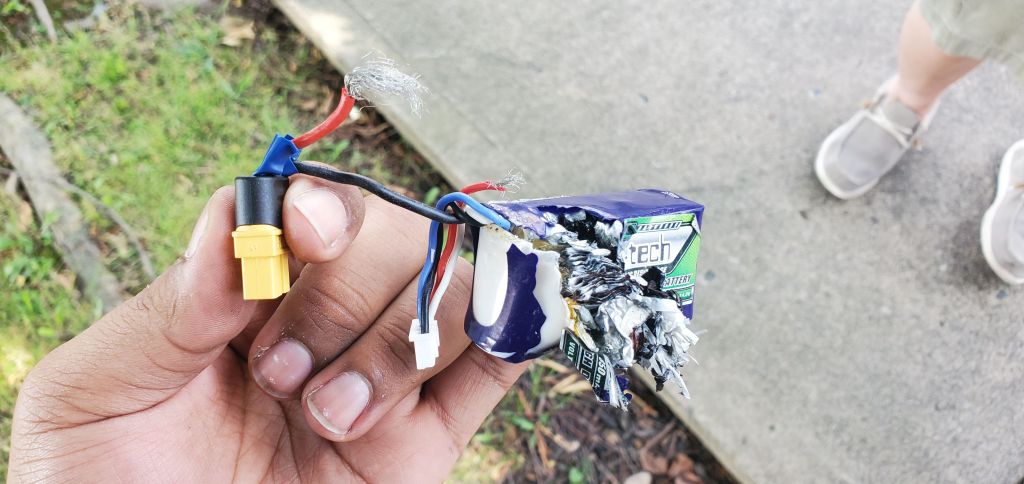
- The voltage of the weapon needs to be increased. Once the weapon hit about 60% power the machine moved far more slowly than Cattywampus who ran the same system. Increasing voltage to 4s would be critical to ensure good function.
November
Redesign
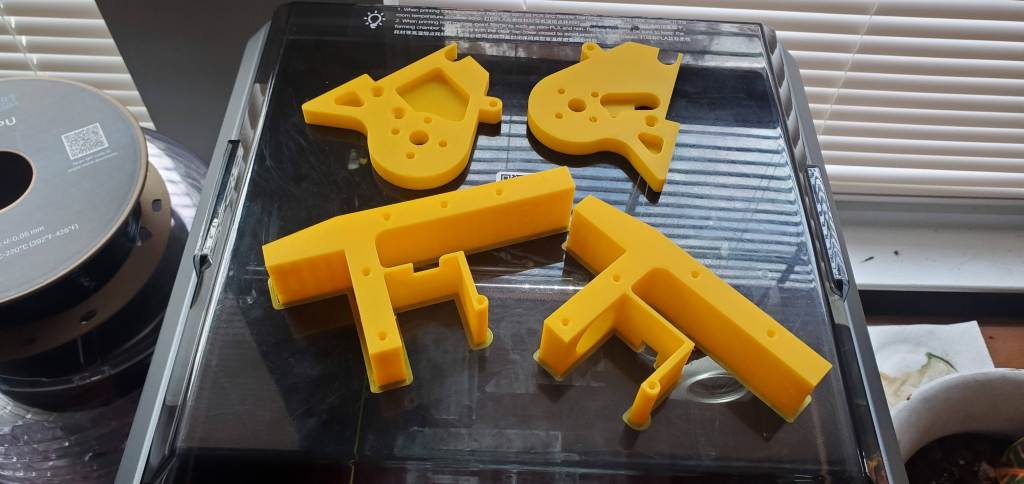
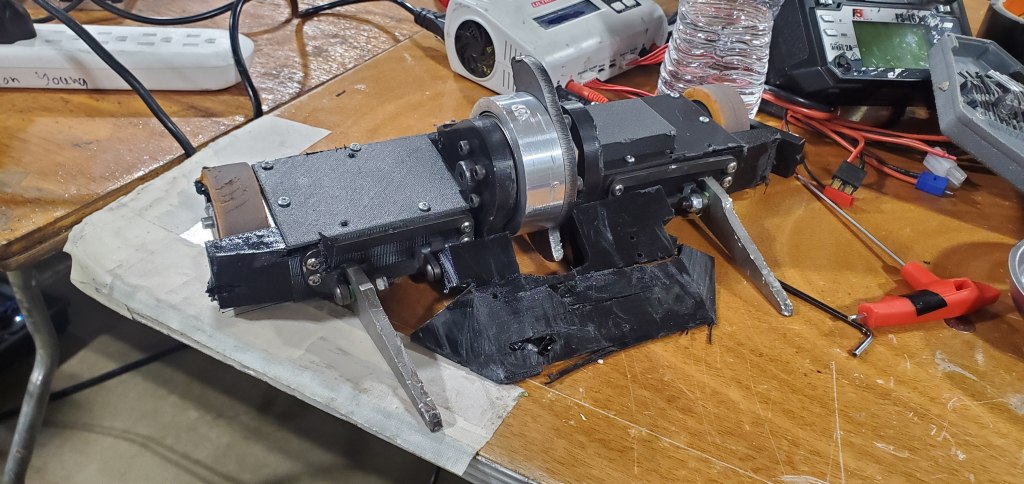
The next event for Phenomena was the Robot Ruckus in November so it was time to take those lessons and try to apply them. Since the Nylon chassis shattered the bulk of the efforts were to see if it could be replaced with TPU and steel. Unfortunately since the steel is so heavy the first place to get weight back was the servo. This loss pained me as it was the key element which kept the machine from just another basic vertical spinner but it was critical to prioritize what lessons to learn first. This version was also more narrow as the previous one as the goal was to minimize the amount of wasted volume in the robot to ensure enough weight for the 4s Lipo. The UHMW uprights were also removed as the center area proved to be a weakpoint where the machine would frequently flex around. Since TPU was so flexible it was critical to have any stiffness methods utilized to ensure the machine wouldn’t have issues in use.


The assembly of the machine went together very fast due to components being largely the same as the previous version. The TPU unibody took about 14 hours or so to print but total robot transplant was maybe 3 hours. The first thing I noticed was how forward it leans and how narrow it was. It definitely didn’t feel as balanced as the previous version but it was best to figure it out while it was already here.
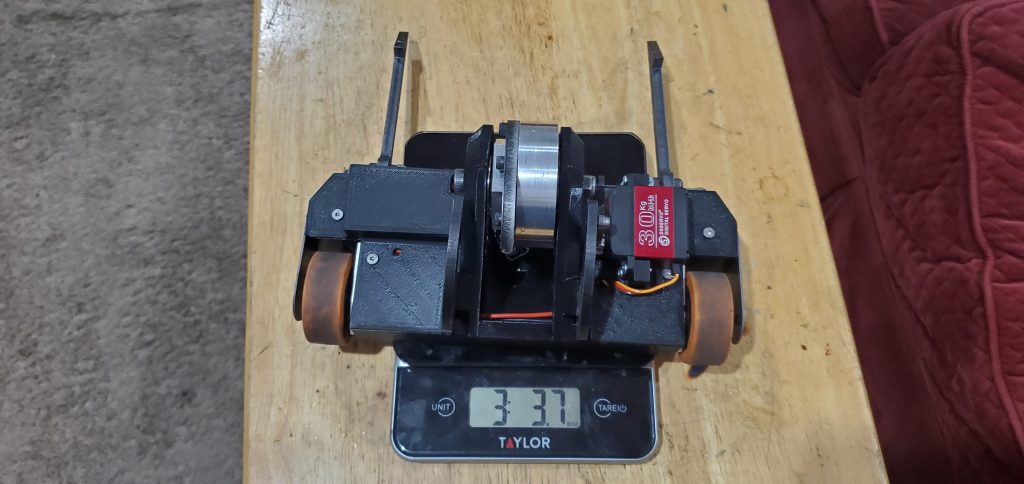
I tried again to see if a servo could potentially work, but the scale quickly dashed that dream.
After getting the bot into weight, I reprinted the tops in red PLA to continue prototyping. The issue I found with it driving around in the garage was the front mounts digging into the ground as well as the robot twisting in the test box due to the TPU being too floppy. I experimented with moving the weight around (first with adding some scrap to the back and third with the the forks themselves being moved to the back. The robot drove dramatically better with the weight moved so it was clear that this adjustment had to be made. However, there was no more room to make adjustments to this version so, less than two weeks from flying down to Florida for the trip, it was time to rebuild the robot.
Redesign (Again)
And now onto an entirely new design! Through the magic of printing prototype shapes in PLA, most of an entirely new version was created in less than one week. Its very similar to the previous version with only two real changes
- The machine became more wide and less deep. This not only makes it more similar to Phenomenon, but also moved the center of gravity closer to the driveline of the machine.
- UHMW was returned to the chassis for use. Not only the center rails were this, but also the backplate of the machine. This created a skeleton that the TPU body would connect to thereby providing stiffness to the machine.
The center rail shape still needed to be tuned more so another pass was used to get the machine driving correctly. Unfortunately due to its width there wasn’t a great way to give it room to test weapon and drive together (it was now over half the width of my testbox) and it was too soon to competition to go down to the Hive for full test so I had to send what I had and make it in the final materials.


In another interesting experiment, I elected to try carbon fiber Nylon as the material for the top and bottom plates. While it wasn’t as stiff as G10 Garolite, the ability to rapidly print it with different settings gave it one more chance to steal weight back. Remarkably this material proved itself to be very effective in use as the robot remained plenty stiff and it was incredibly easy to make spares. With the machine together, it was time to head to Robot Ruckus!
Robot Ruckus
You can read about it in the event report here so here are the main takeaways for 2025:
- Ensure more consistent self-righting and smooth handling. This will likely come from weapon torque, weapon supports, and other geometry factors. There is a hope to bring the bracers of Phenomenon back as their purpose in supporting driving is already proven through the machine’s performance. I also fear the center mounts getting too big and allowing other machines to strike those first and miss the already tiny reach on the hubmotor.
- Change the steel mounting. The mounts were strong but did take damage in the final rumble so altering them to be slightly smaller and more replaceable (basically using the parts developed for Cattywampus) would be a huge benefit to get weight back. The chassis was fairly stiff so the steel may be less critical for the overall stiffness of the machine but that will have to be verified
- Get weight back to add a servo lifter again. I really missed not having the servo lifter. For both the cool factor and redundancy factor it is nice to have a lifter for those moments where just a little something extra could turn the tide in your favor or your horns get sniped and a lifter gives you one more chance to keep going. This has been the case in the 30lbers and I think that can still be something in the 3lber. After the steel mounts, the next place to steel the weight back is from the wheels as this is using a full Banebots T81 mount. It is very reliable and the wheels could be used on bigger machines, but utilizing lighter solutions such as custom wheels paired with slimmer mounts like the Repeat Screw Hub could get back perhaps full ounces and allow that upgrade.
- The hubmotor is perfect, though heavy. It does take a large amount of weight and power but its also had zero issues in all of its fights even after being directly struck multiple times. While it would be nice to get some weight back, there’s no reason to change the one part of the machine that has been bulletproof all through the year so it will remain the heart of 2025 so long as it keeps going. There is a hope for a bigger blade too since it should have excess power but that is weight and may be difficult with the other changes having higher priority.
Thank you for reading this far! I hope you have enjoyed following the story of Phenomena in 2024 and if you want more to read keep checking back to the blog for more event reports and year-end write-ups!
